Picture this: you open a cabinet and three mismatched lids slide out, the foil rolls away, and dinner gets delayed — again. It’s a small chaos that steals big time. And it adds up fast.
Without a plan, you end up shoving pans into random shelves, buying spices twice, and wasting food you forgot you had. The visual noise drains focus, the mess invites more mess, and money disappears on organizers that don’t fit. That mental load? It lingers — every meal feels harder than it should.
Here’s the thing: by the end, you’ll have a room-by-room plan, smart zones that match how you cook, and a printable system you can stick on the fridge. You’ll also get a ready-to-use kitchen organization checklist printable and tactics for every cabinet, from pans to plastics. Ready to open that first door with confidence?
Audit What You Own: Clear Counters, Empty Cabinets
Crowded counters make every meal feel harder. Start with a quick audit — a clean surface shows what you actually use and what just eats space. You’ll move faster, waste less, and set up smarter storage next.
Block 45–60 minutes for a single zone. Prep a landing space on the table so items don’t “boomerang” back to counters while you work.
- Four bins or boxes: Keep, Relocate, Donate, Discard
- Microfiber cloth + food-safe cleaner
- Marker + sticky notes
- Tape measure
- Timer
- Gloves
- Trash and recycling bags
💡 Pro Tip: Follow FIFO (first in, first out). According to USDA’s FoodKeeper guidelines, leftovers keep 3–4 days refrigerated and most ground spices hold quality 2–3 years — date and rotate as you go.
- Clear the stage: move everything off the counters into your landing zone. Wipe surfaces now — a clean slate prevents clutter creep.
- Empty one cabinet at a time. Don’t mix zones; batching reduces decision fatigue and keeps tracking simple.
- Sort fast with the four-bin rule. Keep daily drivers, Relocate seldom-used tools, Donate duplicates, Discard cracked plastics, rusted pans, or warped lids.
- Check dates and condition. Scan “use-by,” toss bulging cans, and note spices older than 3 years for replacement.
- Measure interior width, depth, and height. Jot sizes for future organizers like adjustable shelf risers or modular bins.
- Log an inventory count: mugs, pans, food storage, baking sheets. Snap a quick photo — it doubles as a pantry inventory starter.
In practice: picture this scenario — you empty the mug cabinet and find 23 mugs for a two-person home. You keep eight favorites, donate twelve, and relocate three travel mugs to the entry shelf. Ten minutes later, the cabinet breathes, and morning coffee runs smoother.
| Decision | What Stays | When To Choose |
|---|---|---|
| Keep | Daily tools, safe cookware, sharp knives | Used weekly, fits space, good condition |
| Relocate | Holiday platters, backup appliances | Less than monthly use; move to high/low shelves |
| Donate/Sell | Duplicates, mismatched extras | Haven’t used in 6–12 months |
What actually works might surprise you — most clutter fades when you batch decisions by zone, but there’s one detail many home cooks skip until it’s too late…
Smart Zones: Map Prep, Cook, Serve, And Store
Why are you crisscrossing the kitchen ten times per meal? Zones fix that. When Prep, Cook, Serve, and Store live where they’re used, steps shrink and dinner flows — even on busy weeknights.
Here’s the thing: zones aren’t decor. They’re workflow. Anchor each area by the task you do most there, then place tools within arm’s reach. Keep daily items in the “golden zone” — waist to eye level — and push seasonal gear high or low.
💡 Pro Tip: The National Kitchen & Bath Association notes that a clear “work triangle” (sink, cooktop, refrigerator) improves efficiency; aim for 4–9 feet per leg and 13–26 feet total. The CDC also recommends separating raw and ready-to-eat prep to reduce cross-contamination.
Suggested Zone Map
| Zone | Ideal Location | Anchor Items |
|---|---|---|
| Prep | Next to sink with 24–36″ counter | Chef’s knife, boards (color-coded), bowls, colander |
| Cook | Either side of range with landing space | Pans, spatulas, oils, salt, oven mitts |
| Serve | Near dining path or peninsula | Plates, bowls, flatware, trays, napkins |
| Store | Pantry/fridge + nearest cabinet runs | Airtight containers, labels, can risers |
- Mark anchor points: sink, range, fridge. These define flow — don’t fight them.
- Claim a primary prep zone by the sink. Reserve at least 24″ of clear counter.
- Set the cook zone with 12–15″ landing on one side. Keep oils and utensils within one arm sweep.
- Place serve ware near the table route. Trays and plates should load without blocking the cook.
- Group store items by frequency: daily at waist height; backstock high/low. Decant only where it saves time.
- Label drawers by task, not item. “Prep Tools” beats “Miscellaneous.”
In practice: picture this scenario — a narrow galley where knives lived across from the range. You shift them to the 30″ counter by the sink, add a utensil crock beside the stove, and free a plate drawer near the table. Steps drop, spills drop, stress drops.
And this is exactly where most people make the most common mistake — they keep zone-breakers that quietly sabotage the flow…
Declutter Ruthlessly: Keep, Relocate, Donate, Or Toss
You’re not really organizing until you decide what stays — and what doesn’t. Ruthless doesn’t mean reckless; it means clear rules you can follow fast.
What should drive the call when you’re torn between nostalgia and space? Frequency of use, condition, and safety win. Here’s the thing: if it isn’t used weekly and it isn’t in good shape, it shouldn’t live in prime real estate.
Decision Triggers That End Second-Guessing
| Category | Criteria | Examples |
|---|---|---|
| Keep | Used weekly; safe; fits storage footprint | Chef’s knife, 3–4 pans, daily mugs |
| Relocate | Monthly or seasonal use; bulky but needed | Roasting pan, holiday platters, canner |
| Donate/Sell | Duplicates; good condition; no expiry | Extra spatulas, spare sheet trays |
| Toss/Recycle | Damaged, expired, unsafe, recalled | Warped lids, rancid oils, cracked plastic |
Picture this scenario: you pull five spatulas, three colanders, and a nonstick skillet with flakes. You keep one flexible spatula and one high-heat turner, relocate the jumbo colander to a low shelf, donate the extras, and discard the flaking pan. Ten minutes, six fewer items, zero regret.
The truth is, safety beats sentiment in a working kitchen. The Environmental Protection Agency advises proper household hazardous waste handling — think rancid oils, aerosol cleaners, or corroded canisters — so they don’t end up in landfills or drains.
⚠️ Important Warning: Before donating appliances or cookware, check the Consumer Product Safety Commission recall database. Toss chipped nonstick pans and frayed cords; they’re not donation-safe and can be a real hazard in daily use.
Worth noting: donations stretch further with sets. Bundle those extra storage containers with matching lids, or a mixing bowl plus whisk. If you plan to claim a deduction, document fair market value and keep your receipt. For disposal rules or charitable deductions, consult your local waste authority or a tax professional for guidance.
And honestly? This is where momentum builds — but the way you containerize next determines whether the clutter stays gone or creeps right back…
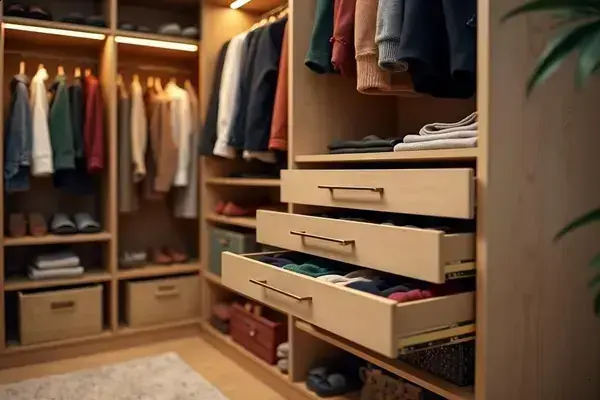
Storage That Works: Containers, Dividers, Lazy Susans, And Labels
The right storage does the heavy lifting. Containers, dividers, lazy Susans, and labels turn random shelves into a system — fast, visible, and easy to maintain.
Here’s the thing: form matters. Square, stackable containers waste less air space than round ones, clear walls show inventory at a glance, and dividers stop utensils from drifting into chaos.
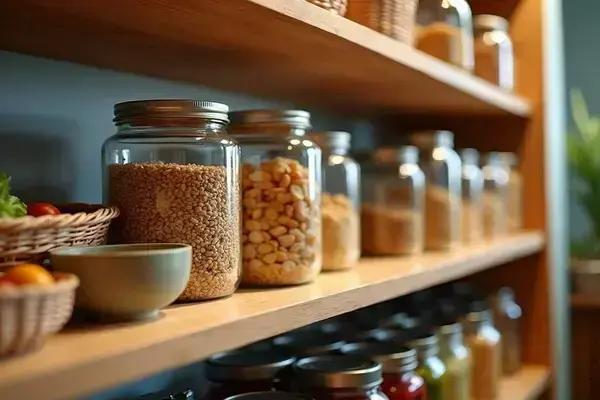
- Airtight modular containers (2–4 qt) with gasket seals for flour, rice, pasta.
- Narrow pantry bins with handles for snacks, pouches, baking add‑ins.
- Lazy Susans (10–12″) with high lips for oils, vinegars, sauces.
- Expandable drawer dividers for spatulas, knives sheaths, foil, wrap.
- Tiered risers for cans and spices; no more back‑row blind spots.
- Labels: thermal labeler or painter’s tape + fine marker.
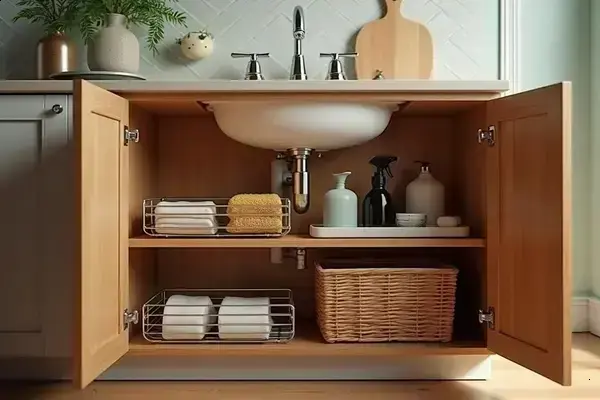
- Slim rollout racks for under‑sink cleaners and backups.
💡 Pro Tip: Measure interior width × depth × height and leave 0.5–1.0″ clearance for frames and doors. The U.S. Food and Drug Administration notes food‑contact materials should be food‑safe; choose BPA‑free plastics or glass, and replace any cracked containers. USDA FoodKeeper guidance supports airtight storage to slow staling and moisture transfer.
- Map capacity: record cabinet and shelf dimensions, hinge clearances, and any plumbing obstructions. Corner cabs? Confirm lazy Susan diameter and spin clearance.
- Group by behavior: decant bulk staples (flour, rice, oats); keep instruction‑heavy items (cake mixes) in original boxes inside a bin.
- Set the shape logic: square containers for shelves, round for turntables, low bins for packets. Standardize 2–3 sizes to stack cleanly.
- Label for action: use a simple schema — Item | Opened MM/YY | Bin Name. Place labels on the low front edge so you can read them from standing height.
- Stress‑test the layout: cook three meals and note friction points. Adjust divider widths, rotate oils onto the lazy Susan, and move rarely used tools down or up.
In practice: you add a 12″ lazy Susan to the dark corner cabinet, shift oils and vinegars onto it, and drop two 4‑qt airtight bins beside. Suddenly, dinners start with one smooth spin — no hunting, no spills.
What actually works might surprise you — the label choices and maintenance rhythm do half the work, and there’s a simple way to make the whole family follow it…
Printable Kitchen Organization Checklist: Your Room-By-Room Plan
Your kitchen won’t stay tidy by wishful thinking — it stays tidy with a checklist you can actually follow. Think of this printable as your command center, not just another pretty page.
What’s inside? Task boxes for every zone (Prep, Cook, Serve, Store), cabinet-by-cabinet prompts, pantry and fridge sections, and a maintenance tracker. You’ll see fields for item counts, measurements, action tags (Keep/Relocate/Donate/Toss), organizer fit notes, and a simple label line: Opened MM/YY + Restock threshold.
How To Use The Printable
- Print two copies on sturdy paper or slip into sheet protectors. Keep one on the fridge, one in the pantry.
- Start with one area per day — 20–30 minutes. Check boxes as you complete each micro-task.
- Record shelf and drawer measurements before buying containers or dividers. Note hinge and door clearances.
- Log counts (mugs, pans, bins) and mark actions: Keep in zone, Relocate, Donate, or Toss.
- Label staples with Opened dates and set a par level (e.g., pasta: 2 boxes). Use the same format across zones.
- Schedule refreshes: weekly for perishables, monthly for cabinets, seasonally for backstock.
💡 Pro Tip: Use FIFO (first in, first out) and date items as you restock. The USDA FoodKeeper guidance supports dating and rotation to reduce waste and keep quality high.
| Area | Key Tasks | Update Frequency |
|---|---|---|
| Cabinets | Count items, note organizer fit, tag Keep/Relocate/Donate/Toss | Monthly |
| Pantry | Decant, label Opened dates, set par levels | Weekly light, monthly deep |
| Fridge/Freezer | Clear bins, wipe shelves, rotate oldest forward | Weekly |
| Drawers | Audit utensils, adjust dividers, remove duplicates | Monthly |
| Under-Sink | Contain cleaners, verify safety caps, inventory backups | Seasonally |
In practice: a busy parent prints the checklist, tapes it inside the pantry door, and sets Sunday ten-minute resets. She dates snacks as they open, hits par levels before school weeks, and reviews one cabinet each month — no more last-minute spice runs.
Who benefits most? Families juggling meal prep, roommates sharing space, renters with limited cabinets, and anyone building a meal-planning routine. Customize by color-coding sections per person, adding allergy notes, or listing “go-to” containers beside each shelf.
Keep the checklist visible and make it the rule, not the suggestion. The right habits in place now make everything easier from here.
Your Kitchen, Finally Simple
You covered the big three: audit what you own, map smart zones, and set storage that actually fits your space. The printable ties it all together with dates, par levels, and quick resets. If you take just one thing from this guide, let it be: keep a visible, simple routine anchored by a kitchen organization checklist printable you update every week.
Before, you chased lids, overbought spices, and cleaned around clutter. Dinner felt slow and noisy. Now you’ll clear counters fast, cook in a straight line, and restock without guessing. Meals flow. Waste drops. You’ll feel in control every time you open a cabinet.
Which cabinet will you tackle first with the checklist — spices, plastics, or pots? Tell us in the comments!

About the Author:
Claire Anne Foster is a home organization enthusiast, lifestyle writer, and the founder of this blog — built for people who want a cleaner, calmer home without spending every weekend doing it.
After years of testing every organization system, planner, and cleaning routine she could find, Claire realized that most advice was either too complicated to maintain or too generic to be useful. So she started creating her own — simple, printable, and designed for real life with real schedules.
Claire is not a professional organizer or interior designer — just someone who genuinely loves a well-organized home and believes that the right checklist or routine can change how your entire week feels. Every resource on this site is practical, tested, and designed to be used — not just pinned and forgotten.
When she’s not writing or reorganizing her pantry for the third time, Claire is testing new meal planning systems, exploring better morning routines, and convincing her family that yes, everything does need a labeled bin.